Submitting astronomical data
Last updated on 2023-10-31 | Edit this page
Overview
Questions
- Who need to submit their data?
- How and where to submit your data?
- What is a ReadMe file?
- Do and don’t when submitting data
Objectives
- Fill a ReadMe file
- Submit your data in the existing and new Open Science systems, keeping in mind the Virtual Observatory (VO) standards
Overview
In the following Chapter, we detail the data submission part which happens after the acceptance / publication phase.
Not everybody needs to send their data to CDS! We invite you to read carefully the next sections to understand your next steps.

Who need to submit their data?
If your article does not contain any tables, you can skip the following!
Otherwise, the following checklist summarizes what to do.
More information on the submission routes per journal are available in the Chapter “Submission routes and journals”.
Where to deposit the data?
Two routes are possible to submit your data to VizieR:
- Option 1: If not too bulky, use the submission online
interface
- The upload will generate a ReadMe skeleton file based on
your tables and perform a few basic checks.
- You will need to check and complete this ReadMe file.
- Alternatively, if you already have created a ReadMe file, you can upload it directly along with your tables.
- In addition to your table, FITS files (spectra or images) for associated data can be uploaded.
- The upload will generate a ReadMe skeleton file based on
your tables and perform a few basic checks.
- Option 2: Use the File Transfer Protocol
(FTP)
- You can use the Python cdspyreadme library to create the required ReadMe file.
- Tables and other data (not necessarily FITS) can be uploaded. More information on the data types accepted are available in the previous Chapter “Preparing your data”.
For larger files or any other questions, please contact the VizieR staff: cds-cats(at)unistra.fr .
ReadMe file
The why and what of the ReadMe file
To be reusable, any data needs extra information. In astronomy, the convention is to give this information (authors, title, references, summary, etc…) in a separate file called ReadMe.
Every catalogue in the Virtual Observatory registry has its own ReadMe. Numerous examples can be found on the FTP directories at CDS. A typical illustration could be e.g. J/A+A/382/389/ReadMe.
Here is an example of a ReadMe skeleton:
Reference             Short Title                                (Author+, Year)
================================================================================
Title of the paper
    Authors
   <Reference (200Y)>
   =20YYjjjjjvvvvLppppA
================================================================================
ADC_Keywords:
Keywords:

Abstract:
Description:

Objects:
    -----------------------------------------
       RA   (2000)   DE    Designation(s)
    -----------------------------------------

File Summary:
--------------------------------------------------------------------------------
 FileName Lrecl  Records  Explanations
--------------------------------------------------------------------------------
ReadMe       80        .  This file
table.dat    28      120


Description of file:    [if needed]

See also:

Byte-by-byte Description of file: table.dat
--------------------------------------------------------------------------------
   Bytes Format Units   Label     Explanations
--------------------------------------------------------------------------------
   1-  8   A8    --- col_0 ? [ 0123456CGMN]
  10- 14   F5.2  --- col_1 ?
  16- 21   F6.2  --- col_2 ?
  23- 27   F5.2  --- col_3 ?


Acknowledgements:

References:

================================================================================
How to generate the ReadMe file?
There are two recommended ways to generate your own ReadMe file:
- With the submission online
interface:
- The upload table process generates a ReadMe skeleton and the standardized tables; both are required for VizieR.
- This ReadMe file can then be edited or you can upload your own file.
- With the cdspydreadme
Python library:
- This package builds ReadMe, standardized tables (in ASCII
aligned format) or MRT tables from tables which can be in different
formats (
CSV,votable,FITS,astropy.Tables, orMRTformats). - The whole ReadMe can then be tested with the command line tool anafile.
- This package builds ReadMe, standardized tables (in ASCII
aligned format) or MRT tables from tables which can be in different
formats (

How to fill the ReadMe file
The Standards for Astronomical Catalogues gives a complete description of the standard for ReadMe files.
In the following we give some tips on how to fill three different sections of the ReadMe file properly. The rest of the ReadMe will be filled by CDS, and thus does not appear below.
The ReadMe file in more depth
General comment: no line in this description file can exceed 80 characters!
It is moreover suggested to limit the textual parts to 70 characters, such that a conversion to FITS could keep the text as COMMENT cards.
- Title of the paper: Title as written in paper
- Authors: List of authors or collaboration
- Reference: If available (bibcode), otherwise the article number
-
Abstract: Describes the scientific results
that the author(s) derived from the data.
- It is simply the one from your refereed paper.
-
Description: Gives the context of the
data, such as instrumentation or observing conditions.
- It should answer the following questions: what, where, when, how.
This section describes the structure of each data files (files with the .dat extension). This description is made in a tabular form, each row describing one field (column) of the data file.
The description is presented as a five-column table with the following elements:
- the starting (from 1) and ending byte of column, separated by a dash -; this dash is however not required for a single-byte column.
- the format of the field, written as a fortran-like
format
- An for a character column made of n characters;
- In for a column containing an integer number of n digits;
- Fn.d for a column containing a float number of width n digits and up to d digits in the fractional part;
- En.d for a number using the exponential notation;
- the units used in the field. SI units are strongly encouraged, avoid the CGS units (for instance, use mW/m2 instead of ergs/s/cm2).
- the label (heading) of the field, made of a single word (no embedded blank); a few basic conventions are used for usual parameters (e.g. positions) and related quantities (e.g. mean errors).
- a short explanations of the contents of the column. This last field may also specify: the available range of the value in the column (using […]), the possibility of having unspecified or NULL values (using ?), the order of the values within the table (increasing or decreasing order). More details can be found here.
The CDS can help you to fill a part of the byte-by-byte description (bytes, format, label), but it is crucial that you fill the units and explanations columns.
Data submission (option 1): Online interface
The first option is to use the online interface available at: https://cdsarc.cds.unistra.fr/vizier.submit/.
This web application enables the upload of the data and invites you to fill a ReadMe file generated by the application. The VizieR upload application will create a TEMPORARY repository containing your tables, associated files (spectra, images, cubes) if any, and the ReadMe file.
However, even after completing all steps, your catalogue will not be readily available in VizieR. Additional work by the VizieR team is needed, including checks and homogenization to our standards, before the catalogue is fully ingested.
In the following, we show how to upload your data step-by-step. Additional information on how to use this service can be found on the VizieR catalogue upload (HELP) page.
Start a session
No account creation is needed. One just needs to choose a login for the session, eg. my_unique_id_2023. The login can be reused until the completion of the process but not after submission.
Note - 1: Your login is tight to a given IP address.
Note - 2: Please contact the VizieR staff: cds-cats(at)unistra.fr if a modification to a recently submitted upload is needed.
Interactive window: VizieR catalogue upload webpage. Note that it is not an image, you can submit your files directly from here.
Upload tables
The VizieR submit service detects automatically the input format. Please, upload here only the regular tabular data (tables). More information on the accepted formats can be found in the Chapter “Preparing your data”.
The upload will generate:
- a ReadMe skeleton including the byte-by-byte based on your uploaded tables
- ASCII tables with aligned columns (FORTRAN Format / MRT (Machine Readable Table))
Note: Check that all the tables are uploaded at this stage. Adding tables later implies to remove all tables and ReadMe.

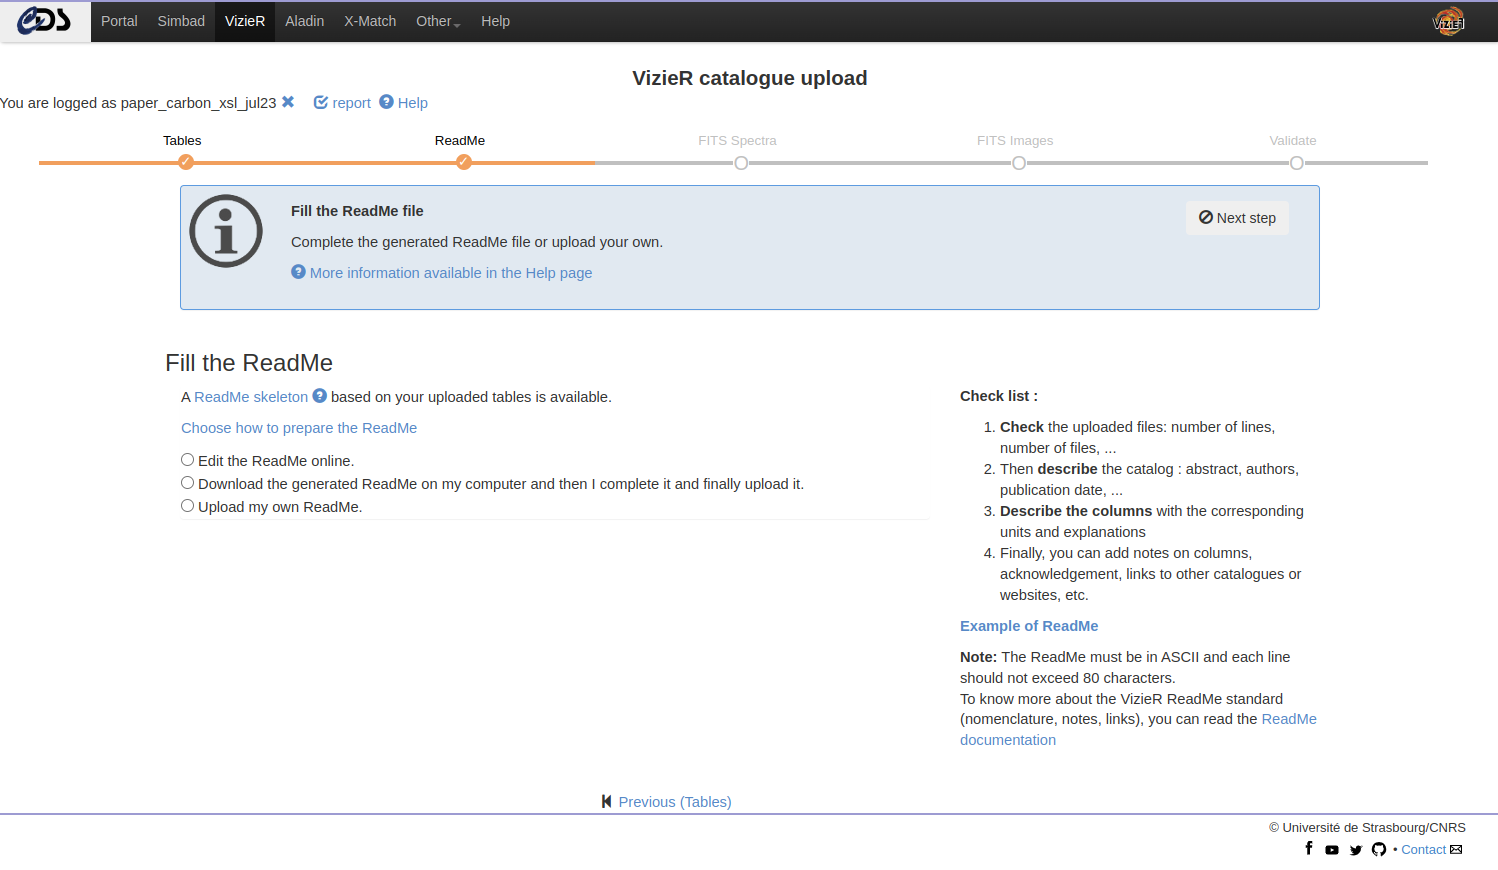
Fill the ReadMe
Once the tables uploaded, the next step is to fill the ReadMe file. You can:
- Edit online
- Download and complete locally
- Upload your own ReadMe
Then you submit the updated ReadMe with the “upload” button:
- This action will check the consistency between the ReadMe and your files.
- The page is refreshed and a report is displayed. This output is the result of the anafile package - see next section.
- In case of error, the CDS recommends to review the ReadMe (and remove the ReadMe).
- But, even if you encountered problems, you can still go to the next step.
Note - 1: The online mode makes regular backups. You can restore the last version and force the backup.
Note - 2: Check that all the tables are uploaded at this stage. Adding tables later implies to remove all tables and ReadMe.
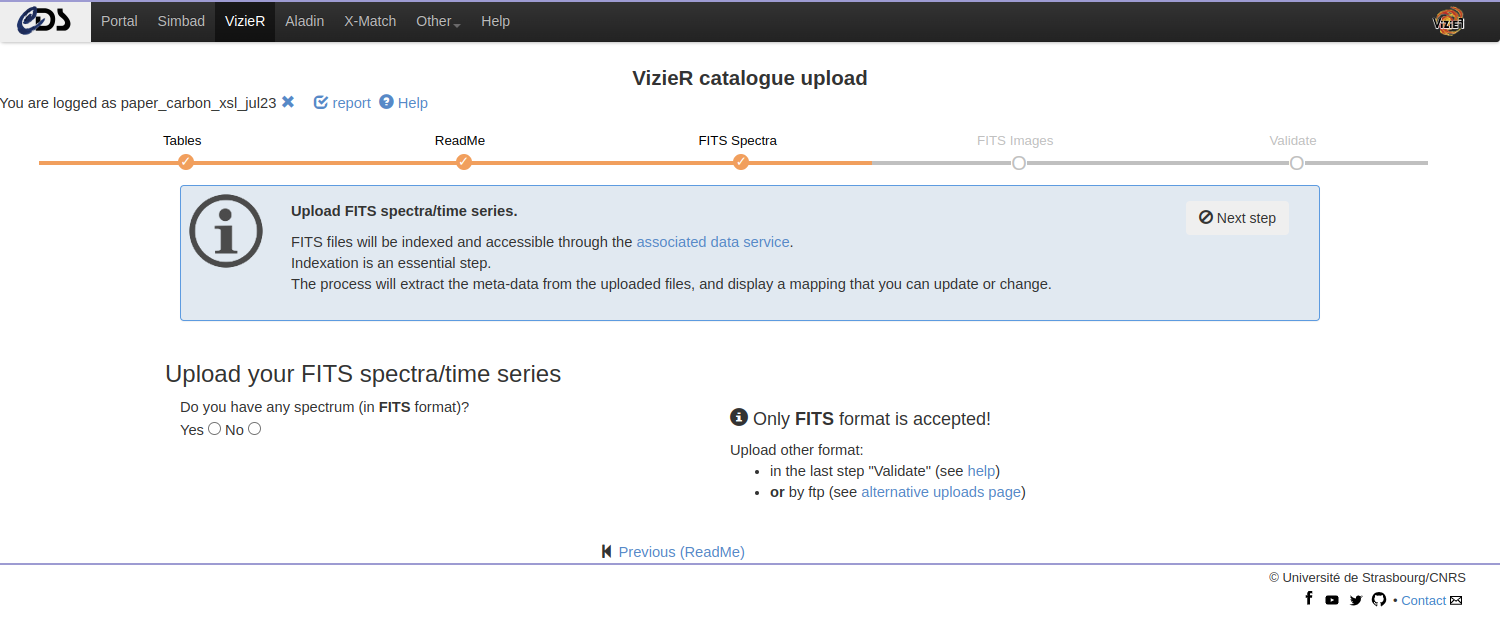
Upload FITS Spectra / Time series
Once the tables and the ReadMe are uploaded, you can upload your associated data: spectra and time series. More information on the accepted formats can be found in the Chapter “Preparing your data”.
The FITS upload generates a mapping between the spectra FITS header and ObsCore keywords. We strongly encourage you to modify the mapping to better describe your data.
Note: Although multiple formats are accepted, only FITS files will be indexed and accessible through the VizieR associated data service and through the Virtual Observatory. The other formats will still be accessible through the FTP.
The uploaded files can be of the following:
- a single FITS file (possibly compressed)
- a collection of independent FITS files gathered into an archive
(.tar)
- Independent means that headers are not similar and each FITS needs a dedicated mapping
- a collection of similar FITS files gathered into an archive (.tar)
- In that case, we make a unique mapping to describe all resources in the archive (.tar). Be careful, this option is available only if FITS have similar headers.
For each upload, a report is available. It is recommended to verify the mapping by clicking on the report header.
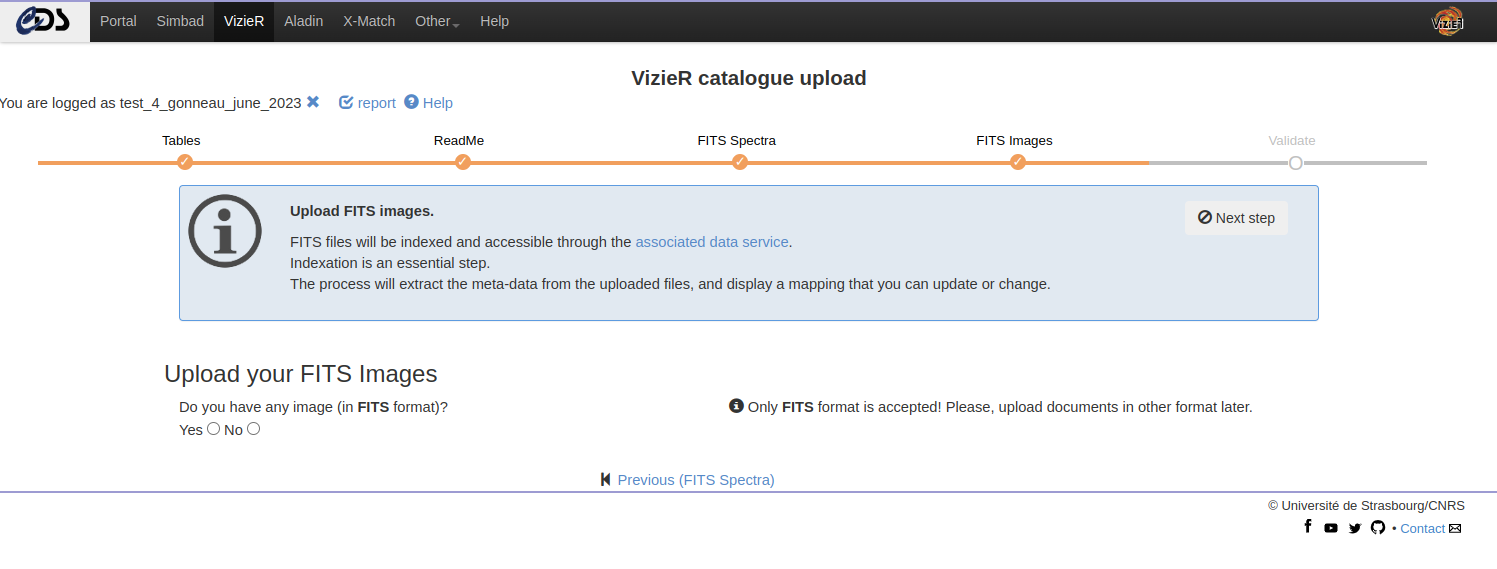
Upload FITS images
FITS images can also be uploaded in a similar way as the FITS Spectra (see above).
More information on the accepted formats can be found in the Chapter “Preparing your data”.
Terminate
This is the last step of your catalogue submission.
Please, verify that everything is correct before ending your session. Note that you can go back to the current work using the same login until you have submitted this page with the “Yes” button at the end of the page.
IMPORTANT POINT: A summary of the files uploaded is available via a temporary link, but DO NOT USE this url as it will disappear after publication.
In the last step you can:
- Upload additional files (keeping in mind the accepted formats)
- Add a message to the VizieR staff
Providing an email address is required at that stage. The email will be used if additional information is needed.
Note: If a modification to a recently uploaded is needed, please contact the VizieR staff: cds-cats(at)unistra.fr.

Data submission (option 2): File Transfer Protocol
An other option is to submit your data through File Transfer Protocol. This option is particularly recommended if the ReadMe file was created using the Python cdspyreadme library and for large files.
Since October 2021, FTP uploads requires a login authentification. A web application is available for authors to obtain a temporary login/password: https://cds.unistra.fr/ftp/token/. It includes some FTP instructions.
VizieR FTP token generation webpage. Note that it is not an image, you can already generate a temporary login.
Generate a temporary FTP login
The first step is to register to get a temporary login: available for 3 days.
To do so, the authors need to provide their email address (e.g. jane.doe(at)astro.fr) and choose a login (e.g. paper_carbon_jdoe_jul23). This unique FTP login (6 characters at least) will be dedicated for the upload of a single catalogue.
On success, a mail is sent to your email address with the FTP login and some instructions.
Upload to the CDS repository
Your freshly created account is ready and available for 3 days. You can put your files directly under the repository (the root ftp directory being dedicated per login).
More information on the accepted data and formats can be found in the Chapter “Preparing your data”.
Type the following command in a terminal to access the FTP server:
ftp ftp.cds.unistra.fr.
OUTPUT
Connected to ftp.cds.unistra.fr.
220 Welcome to the CDS FTP service.
Name: paper_carbon_jdoe_jul23
331 Please specify the password.
Password:
230-------------------------------------------------------
230-CDS FTP repository for authors
230-
230- => temporary directoy for user paper_carbon_jdoe_jul23
230-
230-Note for binary upload:
230-tape "bin" in prompt command to switch in binary mode
230-
230-ftp> bin
230-
230-(create Thu Jul  6 12:09:25 2023)
230-------------------------------------------------------
230 Login successful.
Remote system type is UNIX.
Using binary mode to transfer files.
ftp>
How to upload a table?
To upload a table (e.g. table.dat), use the command:
put table.dat.
OUTPUT
ftp> put table.dat
local: table.dat remote: table.dat
200 PORT command successful. Consider using PASV.
Switching to binary mode
In case of Binary data, make sure that your session in in binary
mode. This option, is not set by all FTP client - To force binary mode,
use the command bin FTP protocol as follow.
OUTPUT
ftp> bin
200 Switching to Binary mode.
Passive mode
By accessing the FTP server in passive mode –
ftp -p ftp.cds.unistra.fr –, one can get the directory
listing using ls.
OUTPUT
ftp> ls
227 Entering Passive Mode (130,79,128,14,36,87).
150 Here comes the directory listing.
-rw-r--r--    1 115      120          1570 Jul 06 14:08 ReadMe.txt
-rw-r--r--    1 115      120        259200 Jul 06 14:09 spectra_test.fit
-rw-r--r--    1 115      120             0 Jul 06 14:02 table.dat
226 Directory send OK.
Notify the VizieR team
Once you are done uploading your data (ReadMe, tables and any other associated data), you need to SEND AN E-MAIL to the VizieR team telling them where you have placed files: cds-cats(at)unistra.fr.
Summary: Data submission
2 options for data submission:
- Online interface
- File Transfer Protocol
The CDS provides tools to build ReadMe file and aligned ASCII tables (Machine Readable Table in FORTRAN format).
- No need to build it from scratch!
The ReadMe file describe your tables by providing all necessary information to locate the catalogue (authors, title, abstract, keywords, acknowledgments, …).
- This highly standardised file allows reusability and cross matching between catalogues.
- A good description of your data is the key to discoverability.
Next chapters
In the next chapters, you will learn what happen to your submitted data before their full ingestion into VizieR and the rest of their journey into the Virtual Observatory and up to EOSC.